Windows 7 has some pretty interesting ways that you can customize the files and folders that you view in Windows Explorer.
Whether you want to show file extensions or view files or folders that might currently be hidden, the choice for how Windows 7 handles these situations is customizable.
But there is another option that you can select, which you might know about. You can change your Windows Explorer settings to use check boxes to select files in Windows 7.
This method will display a check box to the left of a file as you hover over it, and you can click the check box if you want to select the file for future action.
Using Check Boxes for File Selection in Windows 7
At first, I was skeptical of this method because I was not sure what benefit it might provide over other ways to select files.
I have always either used the Ctrl key to select multiple individual files, or the Shift key to select a group of files, and it has worked out well for me.
But then I started thinking about all of the times that I had accidentally copied all of my selected files, or the times that I let go of the Ctrl or Shift key while I was selecting files and the selection was lost and switched to the new file that I just clicked on.
Using check boxes to select files offers a solution to this situation, while still allowing you to use previous methods of file selection.
Step 1: Click the Windows Explorer folder icon in the taskbar at the bottom of your screen. If that folder is not there, you can also open any other folder in Windows Explorer.
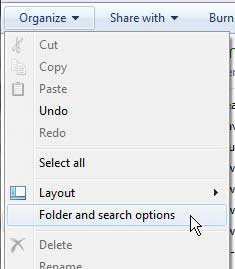
Step 2: Click the Organize button in the bar at the top of the window, then click the Folder and Search Options link.
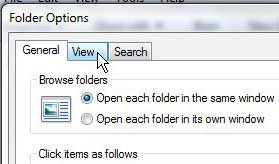
Step 3: Click the View tab at the top of the window.
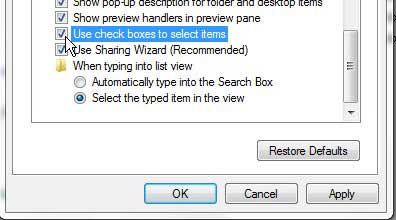
Step 4: Scroll to the bottom of the Advanced Settings section, then check the box to the left of Use check boxes to select items.
Step 5: Click the Apply button at the bottom of the window, then click the OK button.
Now that you know how to use check boxes to select files in Windows 7, you can switch to this setting if you prefer it over the default option.
Whenever you hover over a file or folder in Windows Explorer, a check box will appear to the left of that item. If you check the box, the file or folder will be selected.

Matthew Burleigh has been writing tech tutorials since 2008. His writing has appeared on dozens of different websites and been read over 50 million times.
After receiving his Bachelor’s and Master’s degrees in Computer Science he spent several years working in IT management for small businesses. However, he now works full time writing content online and creating websites.
His main writing topics include iPhones, Microsoft Office, Google Apps, Android, and Photoshop, but he has also written about many other tech topics as well.


