If you’ve tried to edit a layer in your image but the option you wanted to use was grayed out, or you weren’t able to make an adjustment, then you might be trying to figure out how to unlock a background layer in Photoshop.
While most of the elements of a picture that you want to edit won’t cause you any issues, you do have the option to lock layers so that they can’t be moved, deleted, or edited.
Some people use this feature to prevent accidents, but the primary reason that people need to unlock layers involves the default background layer that you find in many new image files.
How to Remove the Padlock Icon from a Layer in Photoshop
- Open your image.
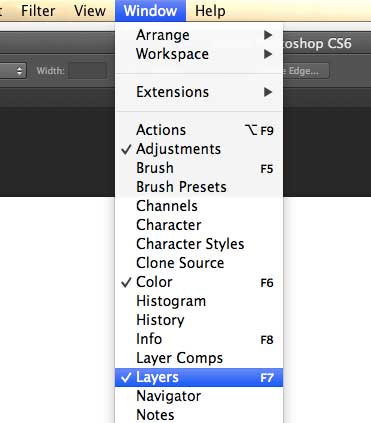
- Click the Windows tab, then check the Layer option.
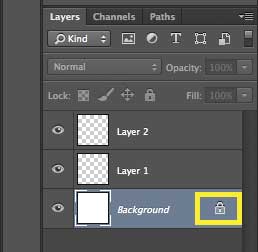
- Select the layer to unlock.
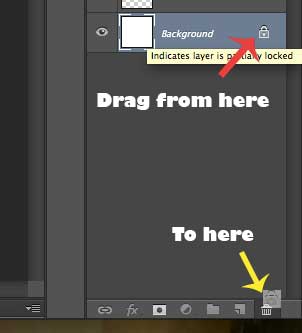
- Click on the padlock icon and drag it to the trash can.
Our guide continues below with additional information on how to unlock background layer in Photoshop, including pictures of these steps.
When you create a new image in Photoshop CS6, or if you open an existing image within the program, there is a strong chance that the background or initial layer is going to be locked.
This can be problematic if you want to make certain changes, such as transforming that layer.
Fortunately, you can follow the steps outlined below to unlock that layer and have more freedom with how you want to manipulate it.
Find out how to flip a layer in Photoshop if one of the layers in your image is upside down or backward.
Unlocking Layers in Photoshop CS6 (Guide with Pictures)
This tutorial is specific to the background layer in Photoshop CS6, but will work for any other locked layer that you might encounter. Additionally, while the steps below were performed on the Mac version of CS6, they will work for the Windows version as well.
Step 1: Open your image in Photoshop.
Step 2: Make sure that the Layers panel is visible by clicking Windows at the top of the screen and checking for the check mark to the left of the Layers option.
If the check mark is there, then the Layers panel is visible. If the check mark is not there, then select the Layers option.

Step 3: Select the locked layer by clicking it in the Layers panel.

Step 4: Click the lock icon to the right of the layer name, then drag it to the trash can at the bottom of the Layers panel.

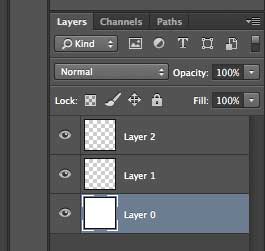
Step 5: You will notice that the lock icon is now gone from the layer, allowing you to freely edit the contents of that layer.

Now that you have completed our how to unlock background layer in Photoshop guide you will be able to unlock any layers in your image that are locked so that you can perform any of the edits that you might require.
When you need to update a password or make a change to the settings for an email account, then our iPhone email account grayed out article can help you when you aren’t able to make those adjustments.
Photoshop files and other images can take up a lot of hard drive space, and they are often files that cannot be easily reproduced.
So it’s a good idea to keep a backup of them on an external hard drive, such as this affordable 1 TB My Passport option from Amazon.
If you would prefer that the new images you create in Photoshop have transparent backgrounds instead of white ones, you can read this article to learn how to do so.
Additional Sources

Matthew Burleigh has been writing tech tutorials since 2008. His writing has appeared on dozens of different websites and been read over 50 million times.
After receiving his Bachelor’s and Master’s degrees in Computer Science he spent several years working in IT management for small businesses. However, he now works full time writing content online and creating websites.
His main writing topics include iPhones, Microsoft Office, Google Apps, Android, and Photoshop, but he has also written about many other tech topics as well.