Whether you have been using your Windows 7 computer for a long time, or have just purchased a brand new computer, you will inevitable need to learn how to uninstall a program in Windows 7.
Many new computers come with unwanted programs called “bloatware” that you will never use, or that you will end up replacing with something better.
But the developers of these programs typically pay the manufacturer in order to be including on the computer, which is one of the many factors that help to keep the price of the laptop at a lower level.
So while it is inconvenient to need to uninstall these programs right after turning on the computer for the first time, the trade off in the long run is worthwhile.
Uninstalling Programs in Windows 7
One thing that you need to be careful of when you are removing programs from your computer is not to go overboard.
It’s easy to start removing a couple of programs at once and wind up deleting half of your installations.
There are some very important programs on your computer that could be very harmful to remove, so make sure that you only uninstall those programs that you know you will not be using.
If you are uncertain about a program, it is usually a good idea to either search online to see what it is used for, or to consult someone that is knowledgeable about computers to see if they think you are safe to remove that program.
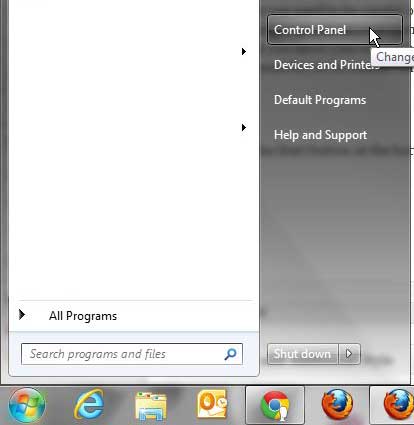
Step 1: Click the Start button at the bottom-left corner of the screen, then click Control Panel in the column at the right side of the menu.
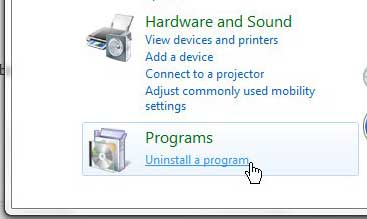
Step 2: Click the blue Uninstall a program link under the green Programs section at the bottom of the window.
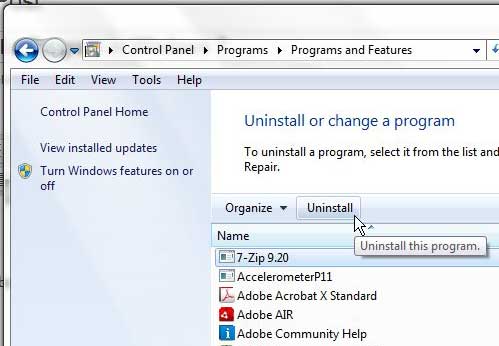
Step 3: Scroll through the list of programs at the center of the window until you find the one you want to uninstall.
Step 4: Click the program once to highlight it, then click the Uninstall button in the horizontal blue bar above the list of programs.
Step 5: Follow the prompts to complete the uninstall process. The exact method will vary slightly from program to program, so be sure to read the screens to determine the correct buttons to click.
Now that you know how to uninstall a program in Windows 7, you can use these steps to get rid of programs that you aren’t using on your computer anymore.
There is actually another possible method that you can employ to access the Add/Remove Programs menu in Windows 7 more quickly. Read this article to learn about that method, as well as some other helpful shortcuts for launching programs and menus faster.

Matthew Burleigh has been writing tech tutorials since 2008. His writing has appeared on dozens of different websites and been read over 50 million times.
After receiving his Bachelor’s and Master’s degrees in Computer Science he spent several years working in IT management for small businesses. However, he now works full time writing content online and creating websites.
His main writing topics include iPhones, Microsoft Office, Google Apps, Android, and Photoshop, but he has also written about many other tech topics as well.


