The Excel 2010 default file save format in .xlsx, which is great when you are working with people that are using Excel 2010 or newer versions.
But when you have coworkers who are using older versions of Microsoft Excel, then they might not be able to open those files.
Our tutorial will show you how to save as xls by default in Excel 2010 by changing an option in the Excel Options menu.
How to Switch the Default Save Type in Excel 2010
- Open Excel.
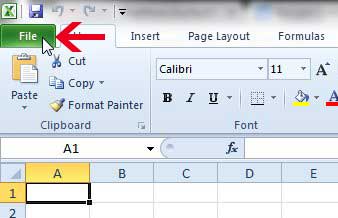
- Click the File tab.
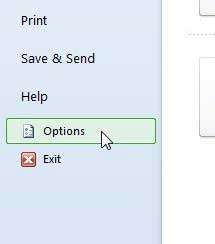
- Choose the Options button.
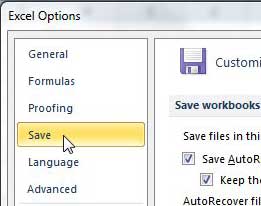
- Select the Save tab.
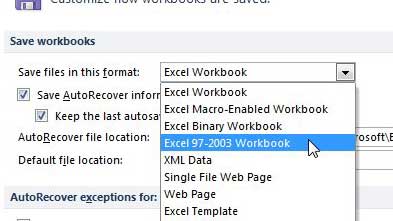
- Choose the Save files in this format dropdown, then click Excel 97-2003 Workbook.
- Click OK.
Our guide continues below with additional information about how to save as xls by default in Excel 2010, including pictures of these steps.
We have previously written about saving a single Excel 2010 file so that it can be opened in Excel 2003 in this article, but that solution might not be ideal for people that constantly need to save in that file format.
For these individuals, a better solution would be to save to the xls file format by default in Excel 2010, ensuring that you do not accidentally create a file that cannot be opened by people using Excel 2003 or earlier. Fortunately, this solution can be implemented with a few short steps.
How to Save to the Excel 2003 File Type by Default in Excel 2010 (Guide with Pictures)
If this is something that you are doing to accommodate one specific person that is using an older version of Excel, then a better option might be to suggest that they download the Office compatibility pack.
While you may be willing to take steps on your end to improve compatibility, people in other organizations or strangers may not be willing or able to make this change.
But you can continue with the steps below to start saving to .xls by default in Excel 2010.
Step 1: Launch Excel 2010.
Step 2: Click the File tab at the top-left corner of the window.

Step 3: Click Options at the bottom of the column on the left side of the window.

Step 4: Click the Save option in the column at the left side of the Excel Options window.

Step 5: Click the drop-down menu to the right of Save files in this format, then click the Excel 97-2003 Workbook option.

Step 6: Click the OK button at the bottom-right corner of the window to apply the change.
Now that you know how to save as xls by default in Excel 2010, you can make it much easier to complete projects with individuals who aren’t using the .xlsx file type.
You can follow a similar process if you want to save in the csv file format by default instead.
More Information About Saving in Microsoft Excel 2010
Working with Microsoft Excel 2010 requires saving files, which is an essential part of the process. Excel is a useful tool for compiling and analyzing data because of its capacity for saving and retrieving data.
Understanding the many ways to save files in Excel 2010 can help you work more productively and prevent losing crucial data.
Using the “Save” option in the “File” menu is the first and most basic way to save a file in Excel 2010. With this option, you can overwrite an existing file or save your workbook with a new name. A fresh copy of the workbook is created on the hard drive of your computer each time you save a file. This version is always available for retrieval and opening.
Using the “Save As” option in the “File” menu provides another way to save files in Excel 2010. You can use this option to save a duplicate of your workbook with a different name. This is helpful if you wish to save a version of the worksheet with changed data or make a backup copy of your workbook. Excel will create a new file with the given name when you use the “Save As” option to save a file, leaving the original file alone.
Additionally, Excel 2010 offers a number of file formats for workbooks to be saved. The “.xlsx” format, which is the default for workbooks made in Excel 2010, is the most used format. Other file extensions include “.xlsm” for workbooks with macros, “.xlsb” for binary workbooks, and “.xls” for older Excel workbooks. You may need to select the proper choices in the “Save As” dialogue box when saving a file in a different format.
You can save workbooks to other places besides your hard drive, like a USB device or a network server, in addition to your hard drive. Use the “Save As” option in the “File” menu and select the desired place from the drop-down list to save a file to a different location. If you wish to access your workbook from a different computer or if you need to share it with others, you may find this to be helpful.
Additionally, Excel 2010 offers the ability to store documents on Microsoft OneDrive in the cloud. With the help of OneDrive, you can save, share, and view your files from any location with an internet connection. Using the “Save As” option in the “File” menu, select OneDrive from the list of potential places to save a file to OneDrive. This offers additional security for your data and is a practical way to access your workbook from any computer.
Finally, it’s critical to comprehend the significance of consistently storing your workbook. It is always a good practice to manually save your workbook as frequently as you can, even if Excel 2010 automatically creates a backup copy of your workbook every 10 minutes. This can help you keep your data safe in the event of a computer accident or other unforeseen circumstances.
Finally, saving files in Excel 2010 is a crucial component of using the program. The “Save” option, the “Save As” option, and saving to other storage locations, such as the cloud, are just a few of the ways to save files. Understanding these techniques and often saving your workbook will help you keep your data secure and reachable.

Matthew Burleigh has been writing tech tutorials since 2008. His writing has appeared on dozens of different websites and been read over 50 million times.
After receiving his Bachelor’s and Master’s degrees in Computer Science he spent several years working in IT management for small businesses. However, he now works full time writing content online and creating websites.
His main writing topics include iPhones, Microsoft Office, Google Apps, Android, and Photoshop, but he has also written about many other tech topics as well.