Adding a header or a footer to a document in Microsoft Word requires just a few steps. But if a document has a footer that it doesn’t need, you may be struggling to get rid of it. Use these steps to remove a footer in Microsoft Word 2010.
- Open the document in Word 2010.
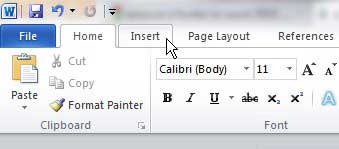
- Choose the Insert tab.
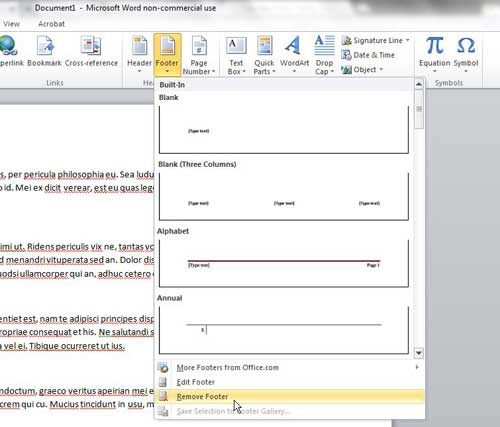
- Select the Footer dropdown menu.
- Click Remove Footer at the bottom of the menu.
Our article continues below with additional information and pictures for these steps.
When you are writing a paper for a specific audience, such as one that you are turning into a teacher, professor or boss, they may impose certain restrictions on the structure of the paper. Microsoft Word 2010 makes it possible for you to customize your paper in any way that these audiences might require.
However, if you have made these changes to a document, or if you have received a document from someone else, you might need to change that formatting before doing something else with the document. Fortunately you can easily remove a footer from a Word 2010 document to eliminate the text that is being displayed in the bottom of every page of your document.
Eliminate Information in a Word 2010 Footer
There are three basic sections of any Word 2010 document – the header, the body and the footer. While you may not have information contained within a particular section, that section is still there. But instead of entering the editing mode for the footer, there is a way to simply remove the entire footer.
Begin the process of removing your footer by opening your document in Word.
Click the Insert tab at the top of the window.
Click the Footer drop-down menu in the Header & Footer section of the ribbon, then click the Remove Footer button at the bottom of the menu.
The entire footer will now be gone from every page of your document. If you decide that you want to restore a footer to the document at some point in the future, you will need to choose the footer layout that you prefer from the Footer drop-down menu. However, any information that was previously contained in the footer will be gone and you will have to completely recreate a new footer.
You can also remove footer information by double-clicking in the footer section of your document, then using the Backspace key to delete the information as though it were any other part of your document.
You can adjust the size of your header or footer, including the margins, by utilizing the guides that appear on the ruler at the left or top of the page. This is the preferred method if you need to be able to visually determine how large you would like those sections to be.
If you need to set a document element to a specific size, then you may prefer to use the options on the Page Layout tab, including the Page Setup menu that can be opened by clicking the small Page Setup button at the lower-right corner of that section in the ribbon.
Find out how to insert comments in Microsoft Word if you are working with a group of people and want to be able to easily collaborate on changes and edits.

Matthew Burleigh has been writing tech tutorials since 2008. His writing has appeared on dozens of different websites and been read over 50 million times.
After receiving his Bachelor’s and Master’s degrees in Computer Science he spent several years working in IT management for small businesses. However, he now works full time writing content online and creating websites.
His main writing topics include iPhones, Microsoft Office, Google Apps, Android, and Photoshop, but he has also written about many other tech topics as well.

