Adding fonts in Microsoft Windows gives you an effective way to acquire the fonts that you need to use in your documents or design programs. But if you have too many fonts, then you might need to uninstall some. Fortunately, the way that you delete a font from a Windows 7 computer is just as simple as it was to install it in the first place.
Learning how to delete a font in Windows 7 is an important element of managing the different font options available to you in programs like Microsoft Word or Adobe Photoshop. It is very easy to install free fonts, or multiple versions of similar fonts, which can make selecting the correct font a difficult task.
When someone learns about some of the free font resources that are available on the Internet, such as Dafont.com, they can sometimes get a little carried away with installing new fonts. While font files themselves do not take up a lot of space on your computer, they can significantly increase the list of installed fonts that are displayed in programs like Microsoft Word.
This can make it difficult to easily locate a font that you use frequently, or it can lead you to inadvertently use a font that you do not want, or that someone else viewing your document might not have. Fortunately, you can learn how to delete a font in Windows 7, which will allow you to remove fonts from the font lists that are displayed in programs that use them.
How to Uninstall Fonts in Windows 7
- Click the Start button.
- Select the Control Panel.
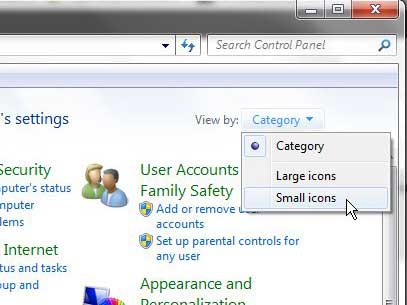
- Click the View by button and choose Small icons.
- Choose the Fonts option.
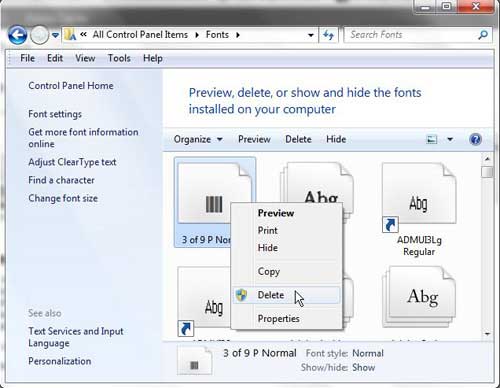
- Right-click the font to uninstall, then click the Delete button.
- Click Yes to confirm.
Our article continues below with additional information on uninstalling a font in Windows 7, including pictures of these steps.
How to Uninstall a Font in Windows 7 (Guide with Pictures)
It is worth pointing out that an installed font is one that is appearing in an installed program from which you can choose your desired font. Font download files saved to other locations on your computer, such as your Downloads folder, can be deleted by right-clicking the font file or folder, then clicking the Delete option. However, if you have already installed that font, you will need to follow the below instructions to properly delete a font in Windows 7.
Step 1: Click the Start button at the bottom-left corner of the screen, then click Control Panel.
Step 2: Click the drop-down menu at the top-right corner of the window, next to View by, then click Small icons.
Step 3: Click the Fonts option.
Step 4: Scroll through the list of installed fonts until you find the one that you want to delete.
Step 5: Right-click the font, then click the Delete option.
Step 6: Click the Yes button to confirm that you want to delete the font.
Note that some fonts will actually include two separate fonts, so you might receive a warning that you are about to delete multiple fonts. The next time you open an application that includes a list of fonts, the one that you just deleted will no longer be an option.
If you need to know how to install a new font in Windows 7 you can follow the steps in the section below.
How to Install Fonts on Windows 7
Once you have downloaded a font file (typically in a zip file as you would get from DaFont or Google Fonts) you will still need to take a couple of extra steps before you will be able to use the font in the applications on your computer.
First, you will need to right-click on the zip file and choose the Extract All option. You can then proceed through the wizard to extract the font files from the zip file.
Once the zipped files have been extracted you can right-click on a font file and choose the Install option. You will need to repeat this for additional font files that were included in the zip file that you downloaded.
How to Uninstall Fonts – Windows 10
The method for deleting a font in Windows 10 is similar to the method that you use to remove a font from Windows 7. However, since Windows 10 has made it a little tougher to get to the Control Panel than it was in Windows 7 and many of the settings for the operating system have been made available in the Settings menu, it is slightly different.
You can delete a font in Windows 10 by clicking the Windows button at the bottom-left corner of the screen, then clicking the gear icon. You can then select the Personalization option and click the Fonts tab on the left side of the window. Finally, you can click on the font that you want to remove, then click the Uninstall button.
Another way that you can open the Fonts menu is to type “fonts” into the search bar at the bottom of the screen and choose the Font settings option at the top of the search results. From there you can select the font to uninstall and click the Uninstall button.
More Information on How to Delete a Font in Windows 7
Note that most of the programs on your computer operate off of the Windows 7 font library. So by deleting a font from Windows 7 in this manner, you will be removing that font from all of the programs on your computer that previously had access to that font. This includes, but is not limited to, Microsoft Word, Excel, Powerpoint, Outlook, Adobe Photoshop, Acrobat, Microsoft Paint, as well as many more.
You can also get to the Fonts menu by typing the word “Fonts” into the Windows search bar.
As we mentioned previously, it’s possible for you to have the downloaded font file on your computer and still uninstall or delete the font from Windows 7. If you want to get rid of the zip file with the font files in it then you will need to right-click on the zip file and choose the Delete option.
If you still have that downloaded file you can always re-install it by unzipping the file then right-clicking on the font and choosing to install it.
Many of the programs that use the Windows 7 font library aren’t going to update immediately after you delete the font. You may need to restart any open applications to ensure that the uninstalled font is no longer appearing in the font list.
You can navigate to the Fonts folder via C:\Windows\Fonts as well.
If you don’t want to change the size of the categories in the Control Panel then you can instead click the Appearance and Personalization option, then choose the Preview, delete, or show and hide fonts option.
Uninstalling a font you want to use in Windows 7 means that you will need to have the original font file available if you decide that you want to reinstall that font in the future.
Some of the font files that you download may have a different font name on your computer once it is installed. Occasionally these names may be different enough that it can be tough to find the new font after it’s installed.
Is your taskbar in a different location on your screen than you would like it to be? Learn how to move the Windows 7 taskbar back to the bottom of the screen and restore its location to the default selection used for a new Windows 7 installation.

Matthew Burleigh has been writing tech tutorials since 2008. His writing has appeared on dozens of different websites and been read over 50 million times.
After receiving his Bachelor’s and Master’s degrees in Computer Science he spent several years working in IT management for small businesses. However, he now works full time writing content online and creating websites.
His main writing topics include iPhones, Microsoft Office, Google Apps, Android, and Photoshop, but he has also written about many other tech topics as well.

