Adding text boxes in Microsoft Excel may seem odd, considering the layout of a spreadsheet and the way that the application is generally.
But you can definitely encounter situations where text boxes are a preferable choice for some data or information.
The ability to move the text box alone can make it appealing, and you can even have a linked cell in a text box so that you can display that data in the box.
Excel 2010’s system of cells provides for an efficient way to organize and manipulate your data.
But occasionally you may be using Excel for a purpose that requires certain data to be placed in a text box instead of a cell.
Text boxes are very versatile, and you can adjust both their appearance and location with just a few clicks of your mouse.
Our guide below will show you where to find the tool that inserts text boxes into your spreadsheet. We will also direct you to the assorted text box menus so that you can adjust your text box settings as needed.
How to Make Boxes in Excel
- Open your spreadsheet.
- Click Insert.
- Select the Text Box button.
- Draw the text box in the desired spot.
Our article continues below with additional information on making a text box in Microsoft Excel 2010, including pictures of these steps.
If you are using Photoshop to edit your pictures, then you might be looking for a way to isolate edits to laters. Our adjust layer size Photoshop article can show you how to change the size of the objects on just one of your layers.
How to Insert a Text Box in Excel 2010 (Guide with Pictures)
These steps were written specifically for Microsoft Excel 2010. You can also insert text boxes in other versions of Microsoft Excel, although the exact steps may vary slightly from those presented here.
Step 1: Open your file in Microsoft Excel 2010.
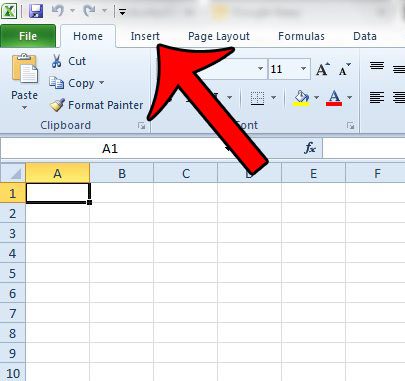
Step 2: Click the Insert tab at the top of the window.
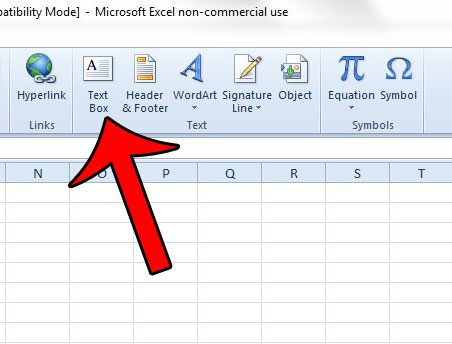
Step 3: Click the Text Box button in the Text section of the Office ribbon.
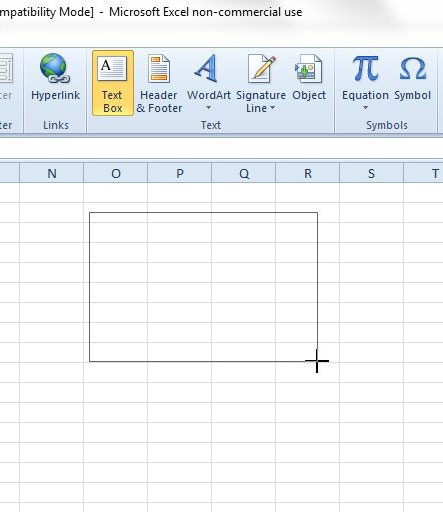
Step 4: Click and hold in the spot on your worksheet where you wish to insert the text box, then drag your mouse to adjust the size of the text box. Release the mouse button when you are ready to create the text box.
Note that you can adjust the size or the location of the text box later, if you wish.
Our article continues below with additional information on how to customize a text box in Excel.
How to Change the Appearance Text Boxes in Excel
If you wish to adjust the appearance of the text box, you can click the Format tab at the top of the window, under Drawing Tools.
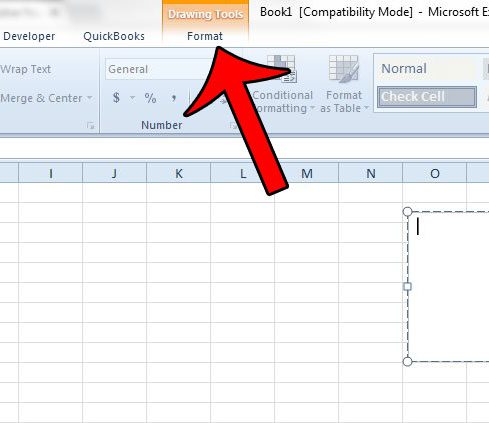
Additionally you can right-click inside of the text box, then select the Format Text Effects or Format Shape option for more settings.
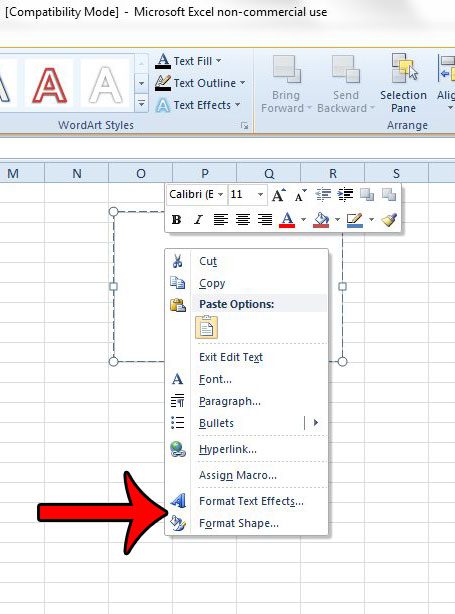
For example, you can remove the border from your text box if you wish to do so.
More Information on How to Make a Text Box in Excel 2010
- While a text box in Microsoft Excel may be used simply as a way to add content to your worksheet without actually placing it in the cells of that worksheet, it’s possible to have a linked cell that populates its data inside the text box. Simply click inside the text box, then click inside the formula bar and type =XX but replace the XX with the cell location. So, for example, if your data is inside cell A1, then you would type =A1.
- An Excel text box may be the focus of this article, but other Microsoft Office applications like Powerpoint and Word give you a way to add text to your document other than typing directly on the document page. You can add a text box in both of those applications if you click Insert at the top of the window and choose the Text Box option.
- You can resize your text box after creating it by clicking on one of the circular handles on the border of the text box. Note that this may adjust the layout of the information inside the text box depending on the manner in which you resize it.
Tips on Working with Text Boxes in Microsoft Excel
The text within a text box can be formatted in the same way that you format text in other documents. Simply type the text that you need, then select it and apply the desired formatting. Or you could make the formatting selection first, then type the text. This lets you do things like change a font, or a font color, or even a font size.
Knowing how to make boxes in Microsoft Excel can give you an extra tool when working with the application if you encounter a situation where the standard cell layout is insufficient. Whether you need to create a text box because you have a piece of information that isn’t part of a formula or won’t be included in any calculations, or you want to create an unusually sized object, a text box can be a helpful solution.
If you need to move to a new line in your text box, you can simply press Enter to do so. This works differently than forcing a new line inside of a standard Excel cell, as you need to hold down the Alt key and press Enter to add new lines within regular cells.
An Excel text box behaves in a similar manner to some other objects, like an image, in that it exists on a layer above the spreadsheet. This allows you to move the box freely around the worksheet. To move the text box, click inside of it, then click on the border and drag the box to a new location. Note that you can’t click on one of the control circles or the arrow, as that will resize the box.
Are you trying to use a formula in a text box, but are finding that the formula will not calculate a result? This article will show you how you can link a cell to a text box to achieve a result close to what you are looking for.

Matthew Burleigh has been writing tech tutorials since 2008. His writing has appeared on dozens of different websites and been read over 50 million times.
After receiving his Bachelor’s and Master’s degrees in Computer Science he spent several years working in IT management for small businesses. However, he now works full time writing content online and creating websites.
His main writing topics include iPhones, Microsoft Office, Google Apps, Android, and Photoshop, but he has also written about many other tech topics as well.