If you’ve ever tried to print a page of Excel cells that didn’t have any information in them, then you probably know that it can be kind of difficult. Luckily there is a way to make a blank Excel sheet printable that doesn’t involve any strange hacks like white text or copying and pasting into a Word document.
How to Print a Blank Spreadsheet in Excel 2013
- Use your mouse to highlight the desired size of your blank spreadsheet.
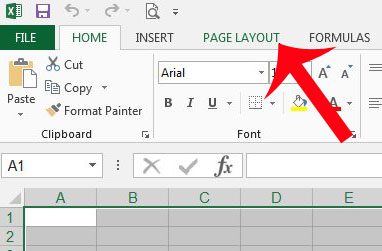
- Click the Page Layout tab.
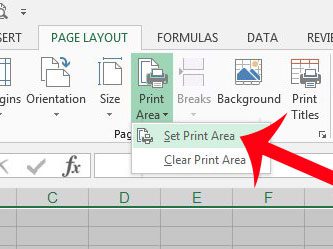
- Click the Print Area button, then click the Set Print Area option.
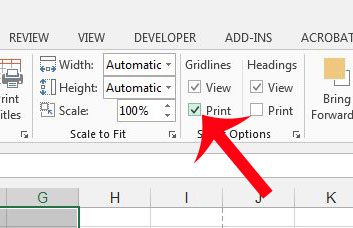
- Check the box to the left of Print under Gridlines in the Sheet Options section.
- Manually adjust cell widths and printing options as needed.
Our guide continues below with additional information on how to make a blank Excel sheet printable, including pictures of these steps.
Find out more about how to add entire columns in Excel with a formula that you can quickly add to one of your spreadsheets.
There are many situations where a blank spreadsheet might be helpful. If you are manually recording information, such as with a physical inventory, then you may find it easiest to create a spreadsheet in Excel that you can print and fill out.
But Excel will only print cells that contain information by default, which can make it difficult to achieve your desired result.
One way to print a blank grid in Excel 2013 is to create a print area, and elect to print gridlines.
This will enable you to create a blank grid or table that you can then print out from your computer.
Our how-to guide below will show you what you need to do to print a blank table with dimensions of your own choosing.
Learn about creating tables in Excel and how to take advantage of this powerful tool for sorting and adding cell data.
Printing Blank Tables in Excel 2013 (Guide with Pictures)
The steps in this article will show you how to print a completely blank spreadsheet in Microsoft Excel. You will need to know how many rows and columns you want in the table, then you will need to make some minor adjustments to the size of those rows and columns based on your needs with the table.
We will also include a step that shows you how to force the table to fit on one page, but you can skip that option if it does not apply to you.
Step 1: Open Microsoft Excel 2013 and create a new workbook.
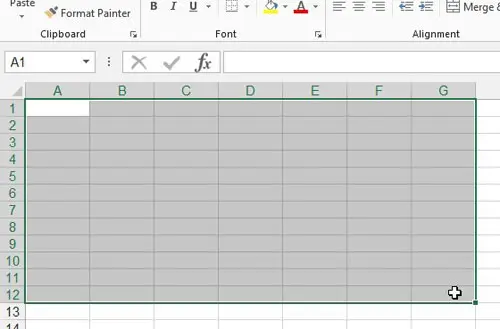
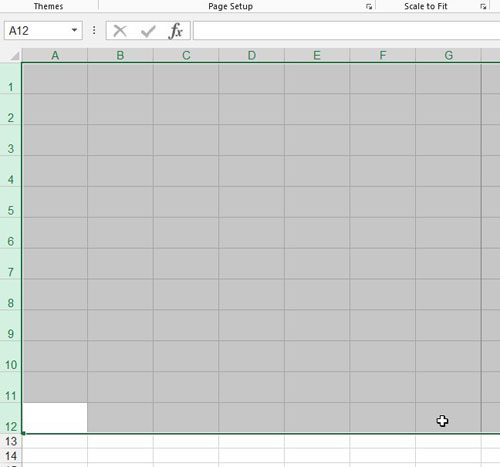
Step 2: Use your mouse to highlight the size of the table that you want to create.
In the image below I am selecting 7 columns and 12 rows.
Step 3: Click the Page Layout tab at the top of the window.
Step 4: Click the Print Area button in the Page Setup section of the navigational ribbon, then click the Set Print Area option.
Step 5: Check the box to the left of Print under Gridlines in the Sheet Options section of the navigational ribbon.
Step 6: Adjust the row heights and column widths as needed.
You can change row heights and column widths by dragging the borders of the row numbers and column letters, or by right-clicking a row number or column letter and choosing the Row Height or Column Width option. This article can show you how to change row height if you are not familiar with the process.
Step 6: Click File at the top-left corner of the window, then click the Print option to open the Print menu.
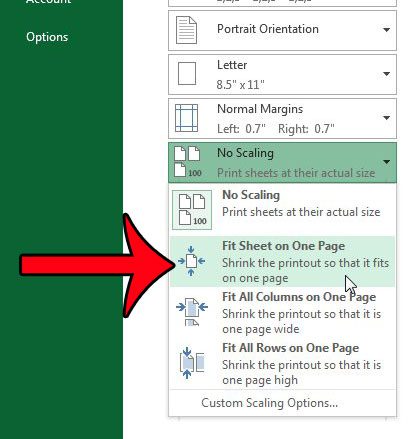
If your table is set to print on more than one page, but you want to keep it on just one page, then click the No Scaling button and choose the Fit Sheet on One Page option. You can then print your blank table.
Now that you know how to make a blank Excel sheet printable you will be able to create all of the blank grids and tables that you need for manually data recording.
You can find additional information here on using a setting in Excel that lets you quickly expand all of the rows in your spreadsheet at once.
If you have a header row at the top of your spreadsheet and you want to print it on every page, then this article can show you how.

Matthew Burleigh has been writing tech tutorials since 2008. His writing has appeared on dozens of different websites and been read over 50 million times.
After receiving his Bachelor’s and Master’s degrees in Computer Science he spent several years working in IT management for small businesses. However, he now works full time writing content online and creating websites.
His main writing topics include iPhones, Microsoft Office, Google Apps, Android, and Photoshop, but he has also written about many other tech topics as well.