Microsoft Office programs typically include a ruler as a means for you to properly size your documents and position objects symmetrically.
Since your printed document is often not exactly the same size as what you see on the screen, this can help to remove the disconnect between the digital document and its physical counterpart.
But the ruler takes up a bit space on the screen, and it may not always be important for your current project. Fortunately the ruler is not a permanently fixed part of Powerpoint 2013, and you can hide both the vertical and horizontal rulers by changing one setting.
Have you tried to add a check mark in Powerpoint and had trouble finding one? Our check mark in Powerpoint article can help you out.
Hiding the Vertical and Horizontal Rulers in Powerpoint 2013
The steps below will hide any of the rulers that are visible in Powerpoint 2013. If you decide later that you would like to use the rulers again, simply follow these steps and check the box that we will be unchecking in a moment.
Step 1: Open Powerpoint 2013.
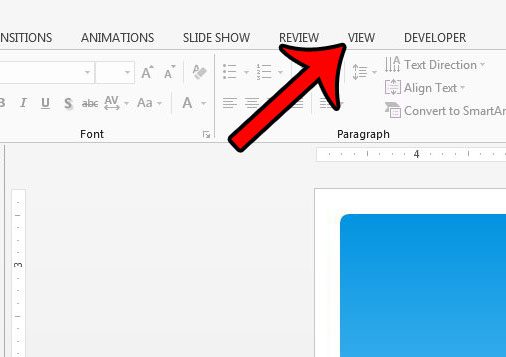
Step 2: Click the View tab at the top of the window.

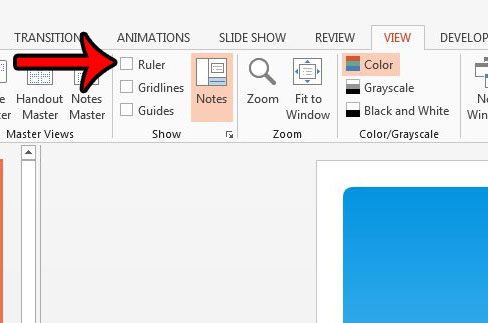
Step 3: Click the box to the left of Ruler in the Show section of the ribbon to clear the check mark.

Both the vertical and horizontal rulers should now be hidden from view.
Now that you know how to hide the ruler in Powerpoint 2013, you can use this option in the application to toggle the display of that feature on or off as needed.
Are the slides in your presentation in the incorrect order? Learn how to rearrange the order of those slides without needing to delete and redo a lot of work.

Matthew Burleigh has been writing tech tutorials since 2008. His writing has appeared on dozens of different websites and been read over 50 million times.
After receiving his Bachelor’s and Master’s degrees in Computer Science he spent several years working in IT management for small businesses. However, he now works full time writing content online and creating websites.
His main writing topics include iPhones, Microsoft Office, Google Apps, Android, and Photoshop, but he has also written about many other tech topics as well.