Microsoft Word has a lot of formatting tools that you can use to customize a document, including a way that you can place a border around the entire page.
This can be a useful feature when you are creating something like a flyer or newsletter that benefits from a lot of visual aids.
You can add a document border in Word by selecting the Page Layout tab, clicking the Page Borders button, setting the border options, then clicking OK.
How to Include Page Borders in a Word Document
- Open your document.
- Click the Page Layout tab.
- Click the Page Borders button.
- Set the desired options, then click OK.
Our guide continues below with additional information on how to use document borders in Word, including pictures of these steps.
Microsoft Word 2010 document borders are a fun and simple way to add some visual appeal to your papers and reports.
They can be particularly helpful when you need to make your document stand out from the rest of the crowd in a stack of similar documents.
It provides a simple point of reference in identifying your document from the others, and the improvement in the presentation of your document could serve as the difference in your writing being read or ignored.
So, unless the person to whom you are submitting your Microsoft Word document has expressly forbidden the use of document borders, you can easily add a border by following this series of steps.
Related: You can read this Word article to learn about including a square root symbol in your content.
Adding Document Borders in Microsoft Word 2010
You can add your document borders at any time during the document creation process, so this procedure can be done when you are formatting the document before you begin writing, or it can be performed when the document is otherwise completed.
Step 1: Open the Microsoft Word application.
With that in mind, open Microsoft Word by clicking the Start button at the bottom-left corner of your computer screen, click All Programs, click the Microsoft Office folder, then click Microsoft Word. (If you have not already done so, consider adding a Word icon to your Windows 7 taskbar using the procedure described in this article.)
Step 2: Create a new document or open an existing one.
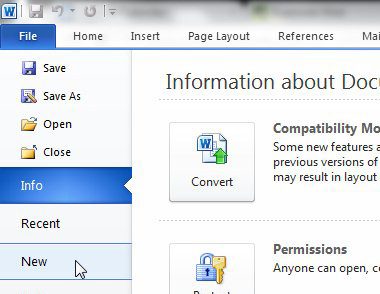
Click the orange File tab at the top-left corner of the window, then click New to create a new document from scratch, or click Open to work with a document that you have already created.
Step 3: Select the Page Layout tab at the top of the window.
If this is your first time using Microsoft Word, or if you have not used a Microsoft Word version since Word 2003, then the layout of the program at the top of the window might seem a little foreign.
The navigation system is now laid out as a ribbon, where all of the Word utilities and formatting tools are organized into tabs.
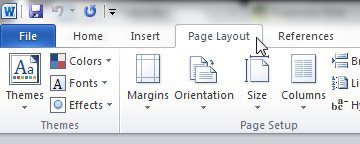
The page layout tools, such as those you need to customize document borders, are included under the Page Layout tab at the top of the window, so go ahead and click that tab.
Step 4: Click the Page Borders button.
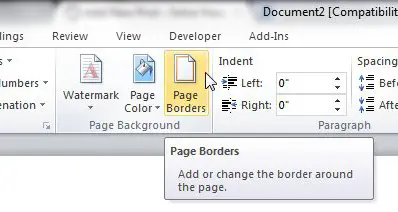
The Page Layout tab is organized into a series of sections, and the section containing our desired tool is labeled as the Page Background section. Click the Page Borders link in the Page Background section to proceed.
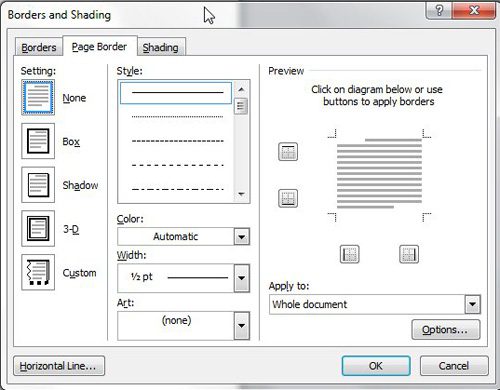
You should now have a Borders and Shading window open on your screen, and the Page Border tab at the top of the window should be selected.
Step 5: Adjust the page border settings as needed, then click OK.
The options on this page are everything that you will need to create your document borders. Under the Setting section at the left side of the window are the options for the general layout of the border.
As you click each of these options, you will notice that the preview section on the right side of the window changes.
Once you have made your choice in the Setting section, you can further customize your document borders by selecting options in the Style, Color, Width, and Art menus.
You can also click the drop-down menu under Apply to at the right side of the window to specify which portion of your document should include document borders.
Finally, if you need to make any changes to the border margins, you can click the Options button to set those.
Once all of your settings have been selected, click the OK button at the bottom of the window to apply the document border settings to your project.
More Information on Page Borders in Microsoft Word Documents
Document borders are lines that can be placed to the boundaries of a Word document page to give it a more polished and professional appearance. They can be used to visually separate portions of a document, bring attention to specific content, or simply make the page more beautiful.
To add borders to a Word document, go to the “Page Layout” tab at the top of the screen. The word “Page” refers to the page on which you will find the word “Page” in the title of this article.
When you select the “Page Borders” button, a new window will open with a number of border styles, colors, and thicknesses to choose from. You can also specify which sides of the page you want the border to appear on, and you can even add custom borders if the preset options are insufficient.
If you don’t want a full border around the entire page, you can instead apply borders to particular portions of the page. To do so, highlight the text or part to which you wish to apply the border and then follow the procedures outlined above.
It is important to note that document borders are merely ornamental and have no bearing on the content or structure of your document. They can be added or removed at any moment without affecting the document’s text or appearance.
The following are the results of a search for a suitable replacement for the aforementioned ad hoc search. Designs such as flowers, stars, and other forms are included. These can be a terrific way to give your document some personality and make it stand out from the crowd.
Overall, document borders are a quick and easy approach to giving your Word documents a professional and polished appearance. Whether you’re working on a business report or a personal project, adding borders can help your document look more visually appealing and organized.

Matthew Burleigh has been writing tech tutorials since 2008. His writing has appeared on dozens of different websites and been read over 50 million times.
After receiving his Bachelor’s and Master’s degrees in Computer Science he spent several years working in IT management for small businesses. However, he now works full time writing content online and creating websites.
His main writing topics include iPhones, Microsoft Office, Google Apps, Android, and Photoshop, but he has also written about many other tech topics as well.


