Read receipts are an interesting part of the iMessage experience for iPhone users.
The ability to know that someone has read your message can be very useful when you are transmitting important information.
Previously the Read Receipt option had been one that was either on or off for every iMessage that you read on your iPhone.
While you might not have a problem with your close friends or family members knowing that you have read their messages, a work colleague or casual acquaintance might not need to know that. Because of this “all or nothing” distinction, many users would choose to turn off those receipts.
But iOS 10 has changed the way that read receipts work on your iPhone, and you can now change the setting for each individual iMessage conversation. So if you have already updated to iOS 10, continue reading below to learn how you can change your settings.
Turn Read Receipts On or Off for a Conversation on an iPhone in iOS 10
The steps in this article were written using an iPhone 5, in iOS 10. This will only work for iMessage conversations with individual contacts. You will not be able to adjust the read receipt settings for group messages, or for regular SMS text message conversations. Click here to see how to tell the difference between an iMessage and an SMS.
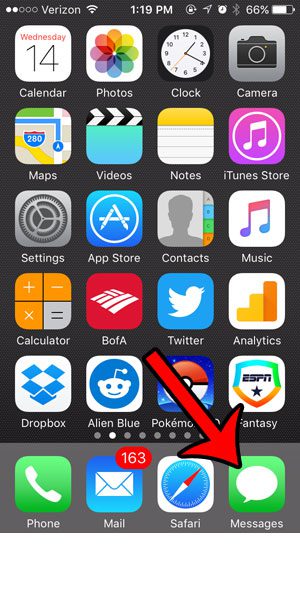
Step 1: Open the Messages app.

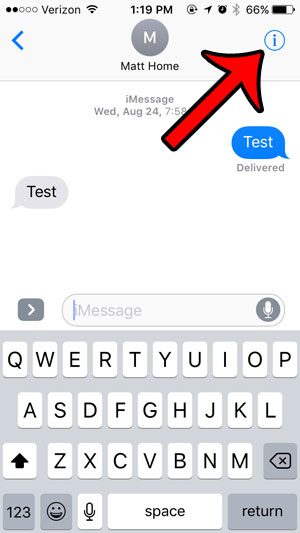
Step 2: Select the text message conversation for which you would like to enable or disable read receipts.
Step 3: Tap the i button at the top-right corner of the screen.

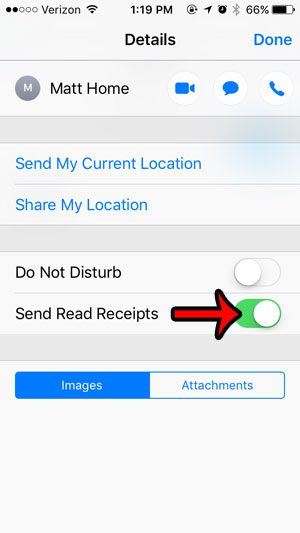
Step 4: Tap the button to the right of Send Read Receipts to change the setting. Read receipts are turned on when there is green shading around the button. They are turned on in the picture below.

Now that you know how ot change read receipt settings for individual message conversations on your iPhone, you can customize this feature even more.
You can then tap the Done button at the top-right corner of the screen when you are done making changes to this screen.
Do you have an ongoing group message to which you would like to add a new member? Learn how to include a new contact in an existing group message.

Matthew Burleigh has been writing tech tutorials since 2008. His writing has appeared on dozens of different websites and been read over 50 million times.
After receiving his Bachelor’s and Master’s degrees in Computer Science he spent several years working in IT management for small businesses. However, he now works full time writing content online and creating websites.
His main writing topics include iPhones, Microsoft Office, Google Apps, Android, and Photoshop, but he has also written about many other tech topics as well.