Effectively using Microsoft Outlook requires that you provide it with all of the credentials and server information that it needs to be able to properly connect to your email provider’s server so that it can download your received messages and upload the ones that you send.
This means that Outlook 2013 will require certain information about your email account in order to download or send emails.
Sometimes it can find that information itself but, in many cases, you will need to enter it yourself.
If you find that Outlook is unable to connect to your email server, then you might need to change the incoming or outgoing settings for your email server.
Our guide below will show you how to open the Account Settings window in Outlook 2013 so that you can change your server settings.
Once you are done, you can test the new settings to ensure that Outlook 2013 can communicate with your email account.
How to Change Mail Server Settings in Outlook 2013
- Open Outlook.
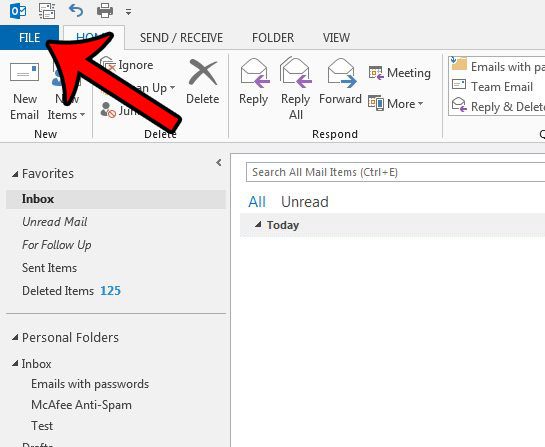
- Click File.
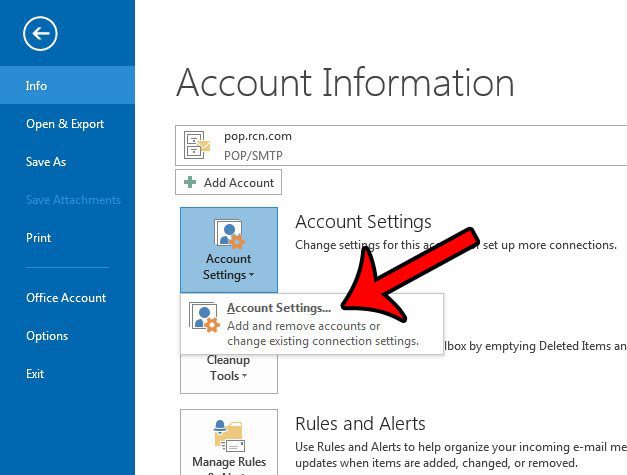
- Select Account Settings, then Account Settings again.
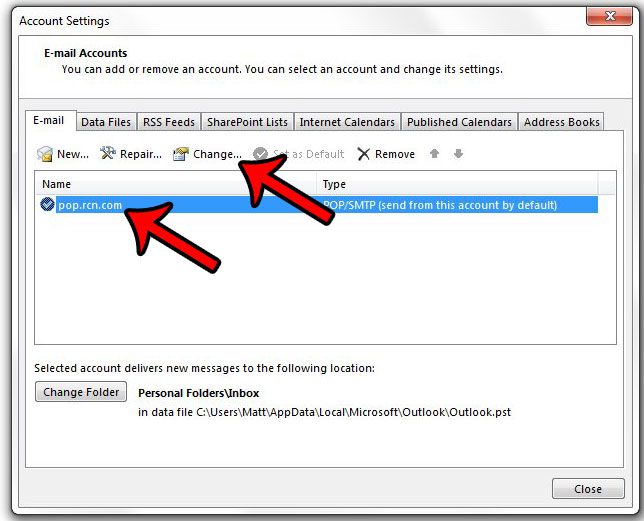
- Choose your email account, then click Change.
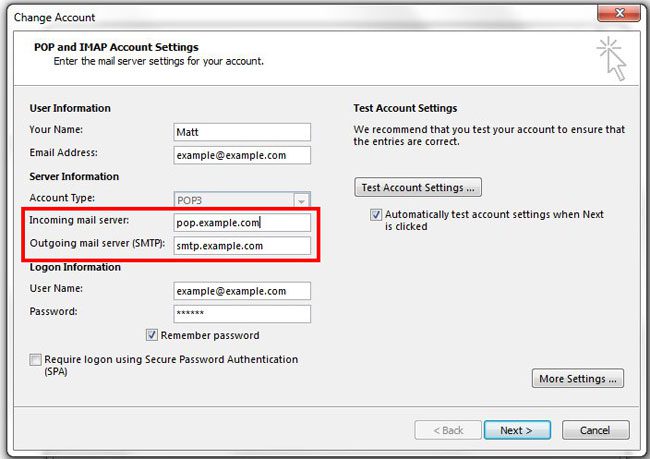
- edit the Incoming mail server and Outgoing mail server fields.
- Click Next.
Our guide continues below with additional information on changing the login information for your email account in Microsoft Outlook 2013, including pictures of these steps.
If you have a Yahoo account and are trying to manage multiple emails, then our Yahoo Mail sign in with password only guide can show you a good way to do this.
Changing the Incoming and Outgoing Server Settings in Outlook 2013 (Guide with Pictures)
The steps in this article will show you how to change the server settings for your existing email account in Outlook 2013.
This includes the incoming and outgoing servers that your email account connects to for mail that you send, and mail that you receive.
If you need to find and change the server port setting, then you can read this article.
Step 1: Open Outlook 2013.
Step 2: Click the File tab at the top-left of the window.

Step 3: Click the Account Settings button, then click Account Settings from the drop-down list.

Step 4: Click the email account that you would like to modify from the list at the center of the window, then click the Change button.

Step 5: Click inside the Incoming mail server or Outgoing mail server fields to change the respective settings. Once you are done, click the Next button at the bottom of the window.
If you have checked the box to test your account settings when you click “Next”, then Outlook 2013 will make sure that it can connect to your email servers. Otherwise, it will close the account settings window.

Our guide continues below with additional information on what you will need ot know for a manual setup of an email account in Outlook 2013.
More Information on Editing Incoming Server and Outgoing Server SMTP Information in Outlook
one nice thing about Outlook and setting up your e-mail address is that most popular email providers use the same settings for all of their accounts.
This means that, for example, if you have a Gmail account, you could just search for “Gmail Outlook 2013 settings” and you would find all of the information that you need regarding the outgoing server tab, secure password authentication, and any other things that may come up.
Basically, the only things that are unique between different accounts are the user name and the email account password.
Plus, for most popular email providers, newer versions of Outlook have an auto account setup where you won’t need to know many more settings than if you were setting up the account on an iPhone or Android smartphone.
And once you have correctly configured the correct encrypted connection you can test account settings on this e-mail accounts window to make sure that everything has been entered correctly.
One of the most interesting features of Outlook 2013 is the ability to schedule future email messages. This article – https://www.solveyourtech.com/how-to-delay-delivery-of-an-email-in-outlook-2013/ – will show you how to take advantage of that feature.

Matthew Burleigh has been writing tech tutorials since 2008. His writing has appeared on dozens of different websites and been read over 50 million times.
After receiving his Bachelor’s and Master’s degrees in Computer Science he spent several years working in IT management for small businesses. However, he now works full time writing content online and creating websites.
His main writing topics include iPhones, Microsoft Office, Google Apps, Android, and Photoshop, but he has also written about many other tech topics as well.