the iCloud service that’s part of your Apple ID provides you with a lot of useful settings.
But if you need to change some of them, you may not know how.
Our tutorial below will show you how to use a Windows application to manage and change your iCloud device settings.
How to Use Different Settings for iCloud
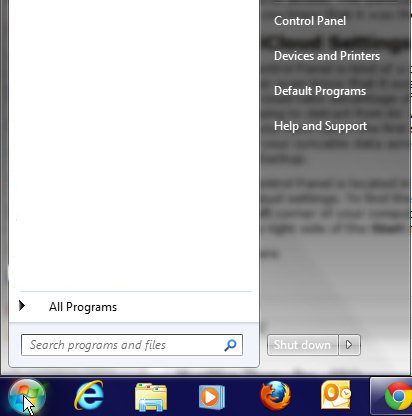
- Click the Start button.
- Choose the Control Panel.
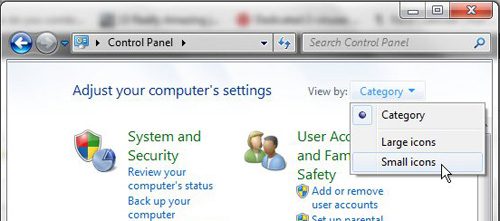
- Switch to the Small icons display.
- Click iCloud.
- Adjust the options.
Our guide continues below with additional information on changing the iCloud settings, including pictures of these steps.
So you’ve updated your iPhone, your iPad, and your iPod touch to the most current version of the iOS software, and it has given you the ability to start taking advantage of the free 5 GB of iCloud storage that Apple gives you.
This 5 GB of storage is the default amount that everyone with an Apple ID receives and if you want to increase that storage amount, you will need to pay to get more.
Maybe you have already read this article about configuring iCloud on your Windows PC, and you have learned that syncing to iCloud from a Windows computer cannot be done directly through iTunes.
But now you want to change iCloud settings, and you are having difficulty locating the program or utility that you need to access.
This particular application is hidden in a location that you probably would not check unless you knew that it was there.
Related Topic: Need to update your device’s name? Our how to change Bluetooth name on iPhone guide can walk you through the steps to do so.
How to Adjust iCloud Settings
The iCloud Control Panel is kind of a confusing entity, and many individuals that should be using it will probably never even know that it exists.
Basically, any person with a relatively new iOS device and a Windows PC could take advantage of this feature. Still, the fact that it is not part of the iTunes interface is going to detract from its’ widespread implementation.
But since you are reading this article, then you have taken the first step towards getting the most out of your Apple products by sharing all of your syncable data across those devices, and keeping a copy of the data in Apple’s servers as a backup.
The iCloud Control Panel is located in the Windows Control Panel, and it is where you will need to go to change iCloud settings.
To find the iCloud Control Panel you will need to click the Start button at the bottom-left corner of your computer screen, then you will need to click Control Panel from the column at the right side of the Start menu.
Click the drop-down menu at the top-right corner of the window, then click Small Icons.
Scroll through the list of icons until you see the iCloud icon. Click that icon to open the iCloud Control Panel and begin to change iCloud settings.
Change iCloud Settings to Choose Which Files to Sync
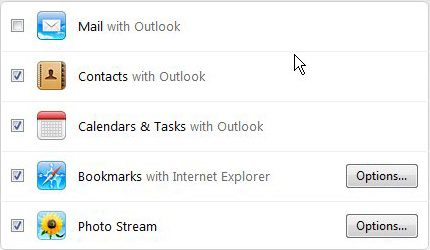
With the iCloud Control Panel open, you will see the five choices that you have for syncing data from your Windows PC to iCloud. These options are Mail, Contacts, Calendars & Tasks, Bookmarks and Photostream. You are free to check whichever combination of these choices that you want, but bear in mind the 5 GB limit that is imposed on you with the free iCloud settings default.
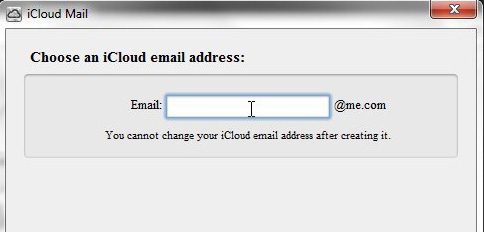
The Contacts and Calendars & Tasks options require no configuration, and will simply sync if you choose to allow them. If you check the Mail option, then you will be prompted to set up an iCloud email address with an @me.com extension.
If you check the Bookmarks and/or Photostream options, then the Options buttons to the right of each of them become clickable. If you click the Options button to the right of Bookmarks, you will be shown this screen
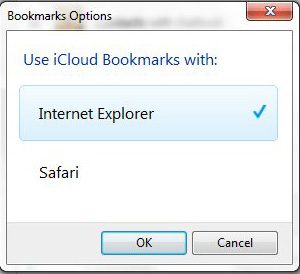
which allows you to sync bookmarks from Internet Explorer and Safari to iCloud.
If you click the Options button to the right of Photostream, you are shown this screen
which allows you to specify the storage location of the photos that you download from iCloud and the storage location for photos that will be uploaded to your iCloud Photostream. So, for example, if you wanted to add photos from your Windows PC to Photostream, you would copy them from their original location to the folder specified under Upload folder, which would sync them with your Photostream.
***Be sure to click the Apply button at the bottom of the window once you have finished changing your iCloud settings.***
Now that you have used the iCloud Control Panel to change iCloud settings, you can return here at anytime if you want to modify iCloud settings after you have seen how the entire process functions in the real world.

Matthew Burleigh has been writing tech tutorials since 2008. His writing has appeared on dozens of different websites and been read over 50 million times.
After receiving his Bachelor’s and Master’s degrees in Computer Science he spent several years working in IT management for small businesses. However, he now works full time writing content online and creating websites.
His main writing topics include iPhones, Microsoft Office, Google Apps, Android, and Photoshop, but he has also written about many other tech topics as well.
