While we often focus on the content of our documents when we are creating something, there are some formatting and page elements that can’t be overlooked.
One such option, page numbers, can make it easier for your audience to reference specific points in a document, or more easily find their place if they have left off reading.
Most Microsoft Office applications include a way to add page numbers, including Microsoft Publisher.
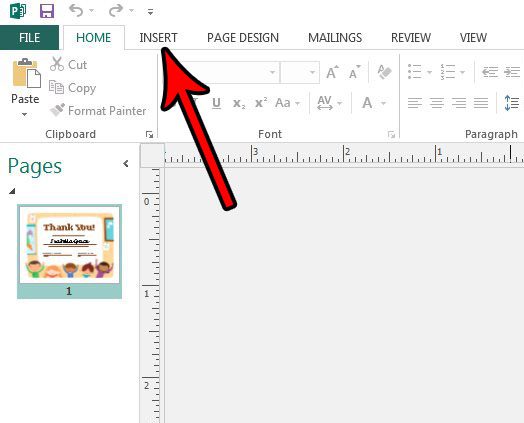
In Microsoft Publisher 2013 you can add page numbers by selecting the Insert tab, then clicking the Page Number button, and choosing one of the listed options.
Page numbers are an important element of multi-page documents. They not only let your readers know which page of the document they are currently reading, but they can also be helpful in re-organizing the document in the event that the pages become separated from one another.
Like Microsoft Word, Publisher also lets you add page numbers to your document. This is a special element of the document, as the page number function is smart enough to manually adjust itself in the event that something changes the number of pages in the document.
This makes it (typically) preferable to a manual page numbering system that could become incorrect if the number or order of pages changes.
Our tutorial below will show you how to insert page numbers in Publisher 2013.
How to Include Page Numbers on a Microsoft Publisher Document
- Open the document.
- Choose the Insert tab.
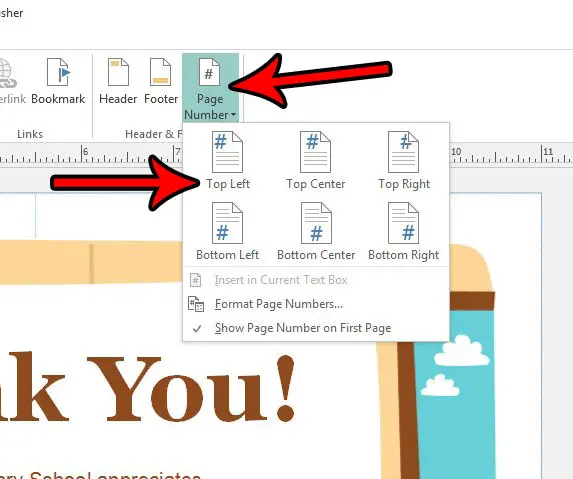
- Click Page Number and select an option.
Our guide continues below with additional information on using page numbers in Microsoft Publisher, including pictures of these steps.
How to Insert Page Numbers in Publisher 2013 (Guide with Pictures)
The steps in this article are going to show you how to add page numbers to the pages of your Publisher document.
The page number will appear on every page of your document, at the location that you choose.
Note that page numbers will also be included on any new pages that you add after inserting the page numbers, and they will update automatically if you delete any of the existing pages from the document.
Step 1: Open your document in Publisher 2013.
Step 2: Select the Insert tab at the top of the window.

Step 3: Click the Page Number button in the Header & Footer section of the ribbon, then choose the desired location for the page numbers.

Our tutorial continues below with additional discussion on using page numbers in a Publisher document.
More Information on How to Use Microsoft Publisher Page Numbers
Note that you can also elect to click the Format Page Numbers button if you would like to further customize the display of your page numbers. Additionally, you can click the Show Page Number of First Page option if you would like to modify that setting as well.
The options for the page number location are:
- Top Left
- Top Center
- Top Right
- Bottom Left
- Bottom Center
- Bottom Right
There is also an option to “Insert in Current Text Box.” If you don’t want to use one of the default page number locations, then you could elect to create a text box in the location where you want the page numbers, then select that option instead.
Note that the option to put the page numbers in a text box is grayed out in my image above, as I don’t currently have my cursor inside of a text box.
You can delete a page number in Publisher 2013 by deleting the page number mark that appears on the page.
If you are working from a Master Page then you will need to select that page first from the View menu, then delete the page numbers from there.
Do you need to make a document in Publisher that isn’t one of the listed sizes? Find out how to create a custom page size in Publisher 2013 and create the type of document that your current project requires.
Additional Sources

Matthew Burleigh has been writing tech tutorials since 2008. His writing has appeared on dozens of different websites and been read over 50 million times.
After receiving his Bachelor’s and Master’s degrees in Computer Science he spent several years working in IT management for small businesses. However, he now works full time writing content online and creating websites.
His main writing topics include iPhones, Microsoft Office, Google Apps, Android, and Photoshop, but he has also written about many other tech topics as well.